Jump Hosts
When a network is divided into multiple subnets, these subnets act as separate networks that can’t directly communicate with each other. A computer can access multiple subnets or networks if it has additional NICs (Network Interface Cards) configured with IP addresses for each subnet. This is called a jump host or a pivot host.
What’s a Tunnel
A tunnel is used to transmit and encrypt data that’s being sent between a local computer and a remote host. By encrypting the traffic no outside sources such as a firewall can see the data that’s being sent. The firewall can see the traffic, but it doesn’t know what it is. A tunnel is created by encrypting and routing traffic through another protocol like ssh.
The Word “Forward”
When talking about forwarding ports at first the word “forwarding” kind of confused me so here is a simple explanation.
Let say I’m calling a company, and the receptionist (local port) answers the phone. After the receptionist (local port) picks up the phone, she forwards the call to the Manager (remote port).
Local Port Forwarding
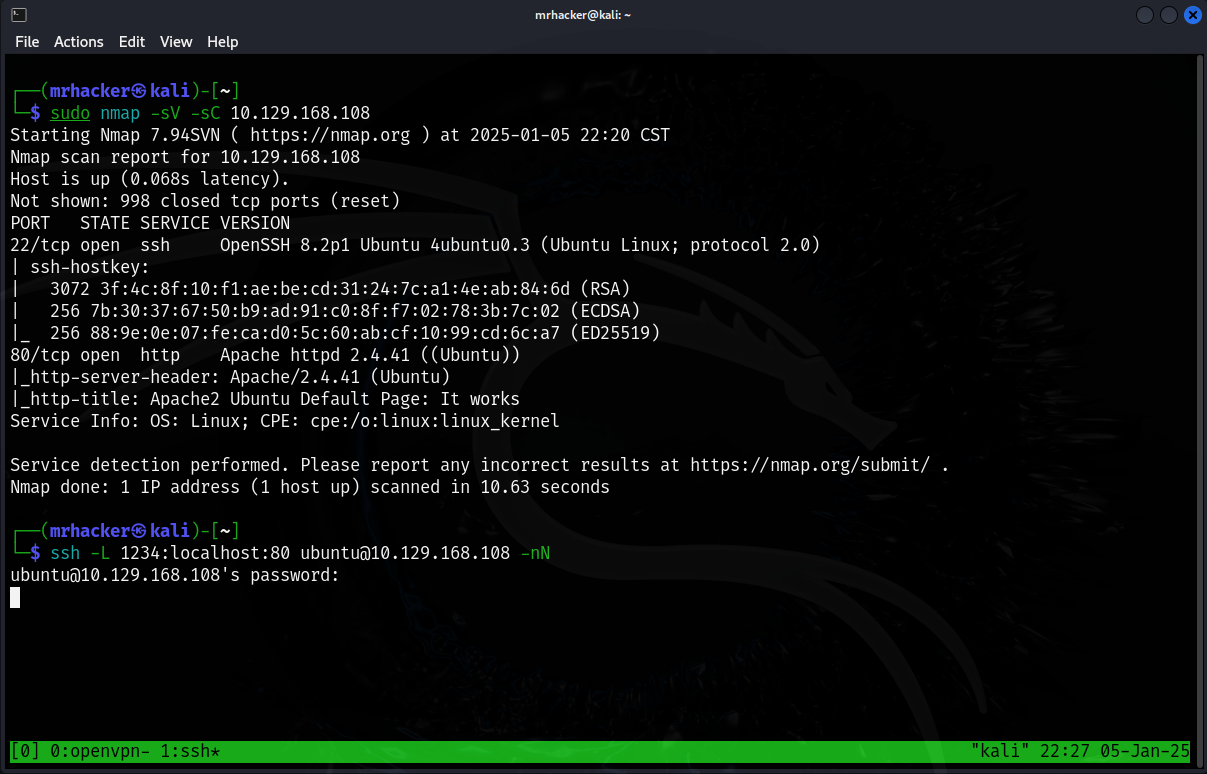
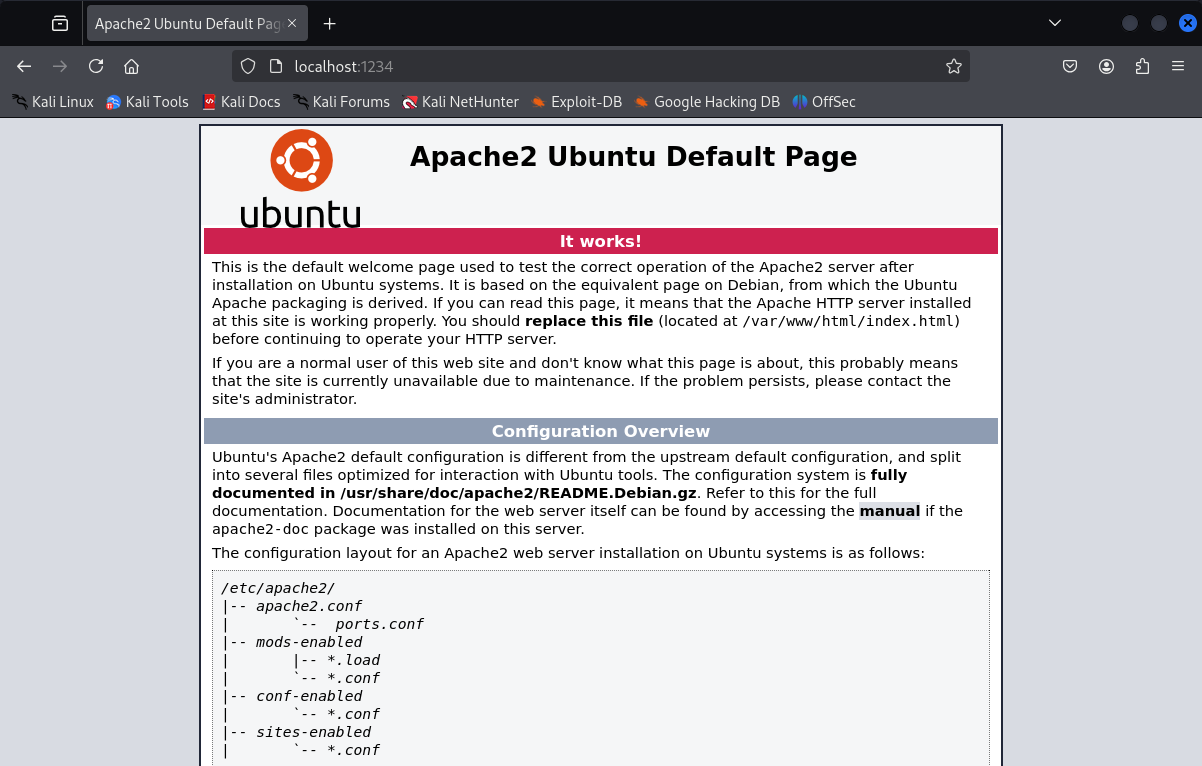
Local port forwarding allows us to forward a local port to a remote one. If a remote computer is running a website on port 80, I could forward my local port 1234 to the remote port 80. When viewing localhost:1234, I will see the website as if it’s running locally on port 1234.
In order to start forwarding ports, we will use SSH to create a tunnel and forward the ports. When forwarding a request to a port through a tunnel, the response from the remote port is also forwarded back through the tunnel to the local port. Since SSH is creating the tunnel, it handles all the forwarding.
Local Port Forwarding Command
This command tells SSH to forward port 1234 on the local machine to port 3000 on the target machine, specifying localhost since port 3000 is running locally. The -L option indicates local port forwarding.
$ ssh -L 1234:localhost:80 [username]@[target_ip]
How The Data Flows
- You send a request to port 1234 on your local machine.
- SSH tunnels the request to the remote SSH server.
- The remote SSH server receives the request and forwards it to port 3000.
- Port 3000 processes the request and sends a response to SSH.
- The remote SSH server tunnels the response to back to the local SSH server.
- The local SSH server forwards response to local port 1234 on your local machine.
Local Port Forwarding Example
In the image below, after running a port scan, I see that the target has a website running on port 80. Therefore, I decide to forward it to my local port 1234 using the SSH command. I use the -nN option to tell SSH not to give me the target’s command line, as I just want the connection.

As you can see in the image below, I am accessing the website on localhost:1234 on my computer as if it’s running locally. This is because I forwarded port 1234 to remote port 80.

What’s Pivoting
If a jump host is compromised the attacker can access the other network segments the host can reach. Pivoting is when an attacker uses a target host to get deeper inside a network. The following command can be used to see if there are other NICs on the computer with access to another subnet or internal network. You can use the commands below to check for pivots.
Linux
$ ip a
Windows
$ ipconfig
Checking for Pivots
The command shows the networks the target has access to. In this example there’s two networks this computer has access to eth0 and eth1. We are reaching the target through eth0’s Ip address however the eth1 network is not accessible to our computer from the outside. In order to access the eth1 we would have to use the target as a pivot.
$ ip a
1: lo: <LOOPBACK,UP,LOWER_UP> mtu 65536 qdisc noqueue state UNKNOWN group default qlen 1000
link/loopback 00:00:00:00:00:00 brd 00:00:00:00:00:00
inet 127.0.0.1/8 scope host lo
valid_lft forever preferred_lft forever
inet6 ::1/128 scope host
valid_lft forever preferred_lft forever
2: eth0: <BROADCAST,MULTICAST,UP,LOWER_UP> mtu 1500 qdisc fq_codel state UP group default qlen 1000
link/ether 00:11:22:33:44:55 brd ff:ff:ff:ff:ff:ff
inet 192.168.1.100/24 brd 192.168.1.255 scope global dynamic eth0
valid_lft 86400sec preferred_lft 86400sec
inet6 fe80::211:22ff:fe33:4455/64 scope link
valid_lft forever preferred_lft forever
3: eth1: <BROADCAST,MULTICAST,UP,LOWER_UP> mtu 1500 qdisc fq_codel state UP group default qlen 1000
link/ether 66:77:88:99:aa:bb brd ff:ff:ff:ff:ff:ff
inet 10.0.0.1/24 brd 10.0.0.255 scope global dynamic eth1
valid_lft 86400sec preferred_lft 86400sec
inet6 fe80::6677:88ff:fe99:aabb/64 scope link
valid_lft forever preferred_lft forever
4: wlan0: <BROADCAST,MULTICAST> mtu 1500 qdisc noop state DOWN group default qlen 1000
link/ether cc:dd:ee:ff:00:11 brd ff:ff:ff:ff:ff:ff
inet6 fe80::ccdd:eeff:feff:11/64 scope link
valid_lft forever preferred_lft forever
Dynamic Port Forwarding and Socks Tunneling
In the example above, the target has access to another network via a second NIC card, eth1. We can access the target through eth0’s IP, but the eth1 network is not accessible from the outside. If we tried to run Nmap against eth1’s IP address directly, it would not work because our computer does not have access to that network. So, how do we run Nmap or give other tools access to this second network? The answer is dynamic port forwarding.
How Dynamic Port Forwarding Works
Set up SSH to act as a proxy on port 9050. Forward Nmap’s traffic to the SSH proxy on port 9050 using ProxyChains. SSH will then tunnel the traffic to the remote SSH server, which will forward it to its final destination—the IP address specified for Nmap. In this case, it is the internal network that only the pivot host has access to via eth1.
Setup SSH As Proxy
The -D flag tells SSH to act as a socks proxy on local port 9050.
$ ssh -D 9050 [username]@[PivotHostIp]
Configure Proxy Chains
The last line tells proxy chains to forward any data through our proxy (ssh) on port 9050.
$ tail -5 /etc/proxychains4.conf
# add proxy here ...
# meanwile
# defaults set to "tor"
socks4 127.0.0.1 9050
Using Proxychains and NMAP
Here Proxychains is used route all Nmap’s traffic to our proxy (ssh) on port 9050. Note: Only full tcp connect scans work over proxy chains no half scans.
$ proxychains nmap -sT 10.0.0.1
Using Proxychains and RDP
You can even use RDP to connect to a target on the internal network using proxychains and dynamic port forwarding. Let’s say we did a ping sweep on the internal network using Nmap and proxychains and found a target that is up.
In the example below, we can RDP into the target using its IP address. So, in this example, the target IP would be the IP address of the host that’s up on the internal network.
Once again, in this example, the xfreerdp’s traffic is forwarded to the proxy (ssh) on port 9050 through proxychains, where it then gets tunneled and forwarded to the target on the internal network.
$ proxychains xfreerdp /u:[username] /p:[password] /v:[target_ip]
Sshuttle
You can use sshuttle to avoid the need for proxychains when using tools like Nmap to access internal networks. This tool only supports ssh.
Install Sshuttle
$ sudo apt install sshuttle
Sshuttle Command Example
$ sudo sshuttle - r [username]@[PivotHostIp] [PivotHostInternalIp]/[Internal_Ip CIDR] -v
Once we run the command above, we can then use tools like Nmap, RDP, or any other tool without proxychains. Their requests will be forwarded to the internal network as if we were still using proxychains and dynamic port forwarding. In the example above, the Pivot host’s internal IP would be the eth1 interface with the IP address 10.0.0.1/24.
Reverse Port Forwarding
If local port forwarding tunnels a remote service to a local port, then reverse port forwarding does the complete opposite. Reverse port forwarding tunnels services from a local port to a remote one.
When it comes to port forwarding, think of the tunnel as a tube with a computer on each end: our local computer and the remote one. With local port forwarding, our local computer reaches into the tunnel from its side to grab or access what’s on the remote computer’s ports. Reverse port forwarding is local port forwarding in reverse: the remote computer reaches into the tube from its side to grab or access what’s on our local computer’s ports.
Like the tunnel example based on who’s trying to make a connection determines what technique we use. If the remote host is trying to make the connection, we use reverse port forwarding. If it’s our local host trying to make the connection, we use local port forwarding.
Reverse Port Forwarding Command
In this example we use tell the pivot host to listen on its Remote IP (10.0.0.1) port 8080 where we then forward port 8080 to our localhost port 1234.
$ ssh -R [PivotHostRemoteIp]:[PivotHostPort]:[localhost]:[LocalPort]
$ ssh -R [10.0.0.1]:[8080]:[localhost]:[1234] [username]@[SSH_ServerIp]
This setup is effective for a reverse shell where the target host initiates a connection request. The pivot host listens on eth1’s IP (10.0.0.1) on port 8080, for example, while the target host runs a reverse shell that connects to the pivot host’s port 8080. The pivot host then forwards this connection to our localhost on port 1234.
The reason we use reverse port forwarding in this situation is because the reverse shell is trying to make the connection to a port—in this case, the pivot host’s port which then forwards the connection request to our local port 1234. If confused go back to my tube example in the start of this reverse port forwarding section.
Ligolo-ng and Chisel
There will be times when SSH is not available, in which case tools like Sshuttle or even basic SSH port forwarding won’t be an option. Two really useful tools that can be used without SSH are Chisel and Ligolo-ng. Because both tools are written in Go and can be converted to binary files, they work on every operating system, making them an ideal choice.
These two tools are somewhat similar in setup, although not the same. The differences are that Chisel is similar to dynamic port forwarding in that all data is tunneled through proxychains. Ligolo-ng, on the other hand, tunnels everything through a TUN interface, which is the interface VPNs use eliminating the need for proxychains.
A basic port scan could take forever with Chisel and possibly half the time or even less using Ligolo-ng. Not only that, but some Nmap scans, like half-scans, don’t work over proxychains. Because of speed and ease of use, Ligolo-ng is the tool I prefer. To keep this post short from becoming any longer, I wrote a separate post on Ligolo-ng you can find here.
Justifying The Means
Pivoting is when a compromised target is used to tunnel and forward data to an internal network. This allows access to machines on the internal network. We use reverse port forwarding or reverse connections to enable targets on the internal network to connect back to our machines.
Reverse connections are used because when the internal machine attempts to make a connection, such as for a reverse shell, it doesn’t know how to reach our machine. To solve this, we forward the internal machine’s connection request to a port on the pivot host and then forward that port back to a port on our local machine where we have a Netcat listener waiting for the connection from the internal machine.
I hope you guys learned as much as I did while writing out this post till next time